
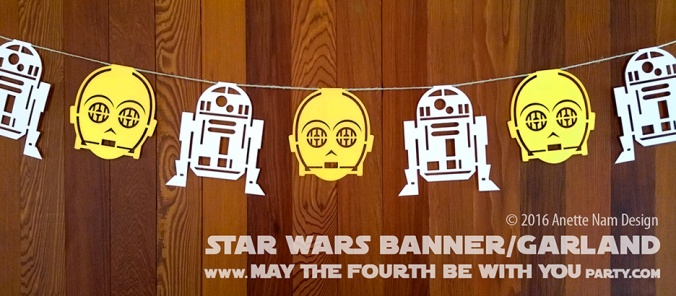
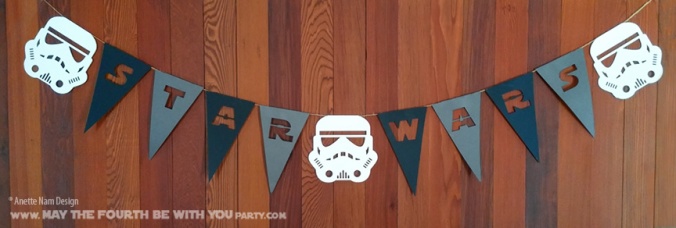
The most popular post this year has been our 2nd Star Wars Banner post. It is really nice to get such positive feedback on the pieces we do! 🙂 THANKS GUYS!! So I am thinking it would be a good idea to post the patterns for the last of the 3 banners we have made so far… while you still have time to make it for the big party. You ARE throwing a May the Fourth be with You Party, right?
We are just starting to plan ours now. The invites are out. The “staging” area (i.e. my office) has all kinds of fabrics, crafts, and bags strewn all around. I am even storing some food there. Last year I couldn’t find Oreo Thin Crisps for our Imperial S’mores in any of our local stores. So when I saw them a few weeks back, I made sure to stack up. Next week, we will start planning the rest of the food, and do some test runs on new dishes. WOO-HOO!!! We might not be able to share them with you in time for this year’s festivities, but we certainly will before next year’s.
The banners, they are of course already done.
If you want to make your own, here is how…
Needed:
- Thick paper like card stock or scrap booking paper. (We used a shimmering yellow metallic for C-3PO.)
- String (we used Jute String
)
- Glue (Yes! Craft Glue
with a foam brush is my favorite)
- X-acto Knife
- Patterns (go to end of post for downloads)
How To:
- Figure out which and how many designs you need.
- Cut the silhouettes out.
- Fold the top of each.
- Measure the window/area the banner will hang.
- Cut the string a to size (add a bit extra, for good measure).
- Fold the string in half to get the middle.
- Starting there, going out to the edges, lay out the flags/designs.
- Starting with the middle one, carefully glue flap and press closed.
- Hang up!

Click here to get the STAR WARS letter patterns in our first Post.
Tips & Notes:
If you are cutting by hand you can use either a jpeg or a pdf. If you are using a cutting machine you will need a vector file. Download the pdf, and convert to the format you need in Illustrator .
And as always, feel free to use the patterns for any and all personal uses, but do not sell any items made with them. We love people sharing, but do not share them off your own site, instead, link to this post. And if you post pictures (anywhere), you need to write “Pattern ® Anette Nam Design” and include the URL maythefourthbewithyouparty.com.
Get Supplies:


Awesome! My brothers birthday was Sunday and we made a ton of decor from your blog. He loved it all! Thank you for the amazing posts!
LikeLike
WOW! That makes me so happy to hear!!!!! I would love to see some photos, not sure if you can upload photos in a comment section. But if you end up blogging about the party, make sure to let me know so I see it. (and please add links of course.)
LikeLiked by 1 person
I will try to!
LikeLiked by 1 person
Pingback: Level Up Your “May the 4th Be With You” Day – Rise of the Geeklings
Pingback: Getting Ready for May the Fourth! (More DIY Banners) | May the Fourth be with You Party
Pingback: My Mom Loves Me! (DIY Flags) | May the Fourth be with You Party
I love these; they are the best I’ve seen! I love them so much that they were the inspiration for the luminaries I made for my kiddos Star Wars themed Kindergarten program. They were a super big hit by all. I used your templates, decreased to 80% and minus the hanging tab, and glued them onto regular brown paper lunch bags. When the lights went down, they truly shined. Thanks for the templates and the inspiration!
(*I can’t upload any pictures, and am not a blogger, but trust me they’d look great lining your pathway to the party.)
LikeLike
Thank you so much for sharing your idea 🙂 It is always really fun to hear when our posts inspire people to do their own project!
LikeLike