
The hubby said it couldn’t be done. So of course I took that as a challenge: the two of us WERE going to be Imperial Guards for the May the Fourth be with You Party!
I immediately got stuck on the helmet. But refusing to admit that my husband was right (and not wanting to pay for $600 for 2 “real” helmets) I was determined to make them from scratch.
There are so many amazingly talented artists, making realistic cosplay costumes out there. When I make mine own however, I tend to prefer making costumes that look like they are homemade. There is something about the found object quality that really appeals to me. So I approached the Imperial Guard costume challenge much the same way I tackle the kids’ costumes. You know, the duct tape method.

We had brown gloves, but forgot to wear them when we took the photos.
It took a couple of weeks of noodling it around in my head, before I figured out what to use to make the masks. Now the choice seems obvious: MILK JUGS!
When I made them a few years back, I worked on a wing and a prayer. So I do not have very specific instructions for you, but I am including a lot of photos, hoping those will help.
Before we get started, make sure you enter our GIVEAWAY! Check out the details here.
Needed:
Helmet:
- Milk Jug
- Red Vinyl Fabric
- Red Duct Tape
- Grey Primer Spray Paint
- Red Spray Paint
- Black Protective Goggles
- Kids Thin Plastic Construction Helmet
- Velcro Tabs
- Awl
- Scissors (NOT your good pair)
- 2 Friends. This is a 3 Person Job: 1 Model, 1 Holder & 1 Tape-er
Cape:
- Red Fabric
(Choose a heavy poly fabric with a tight weave. It will hang well, and you do not need to hem, unless you want to wear it a lot)
- Red Thread
- Elastic Band
- Pins
- Good Scissors
- Safety Pins
Misc:
- Brown or Burgundy Gloves
- Brown or Burgundy Long Sleeve Shirts
- Brown or Burgundy Pants
- Brown or Burgundy Boots
How To:
The Helmet:

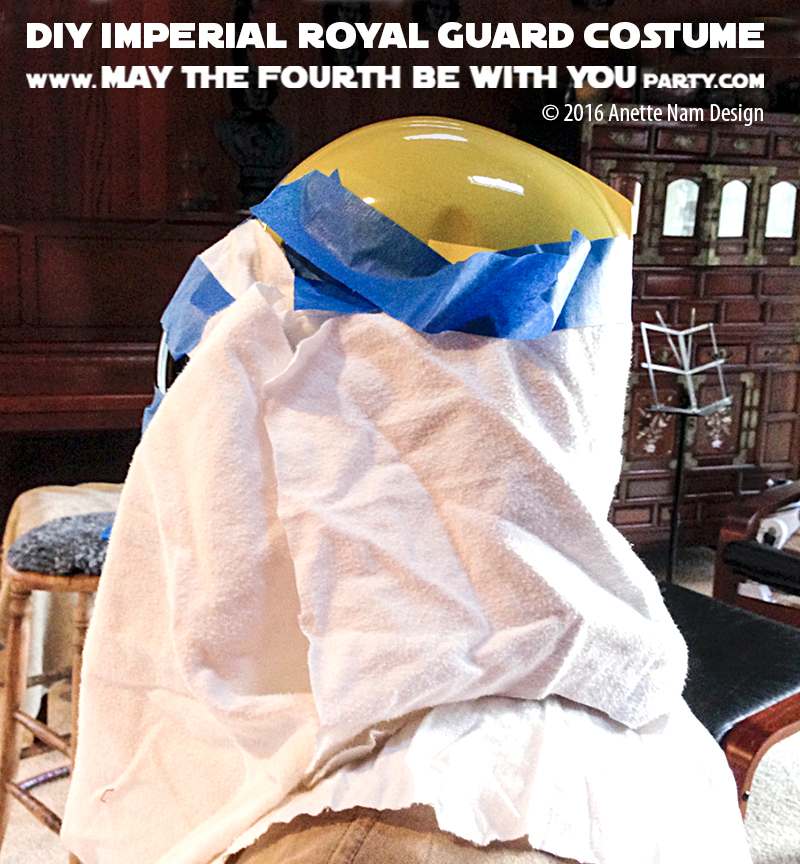
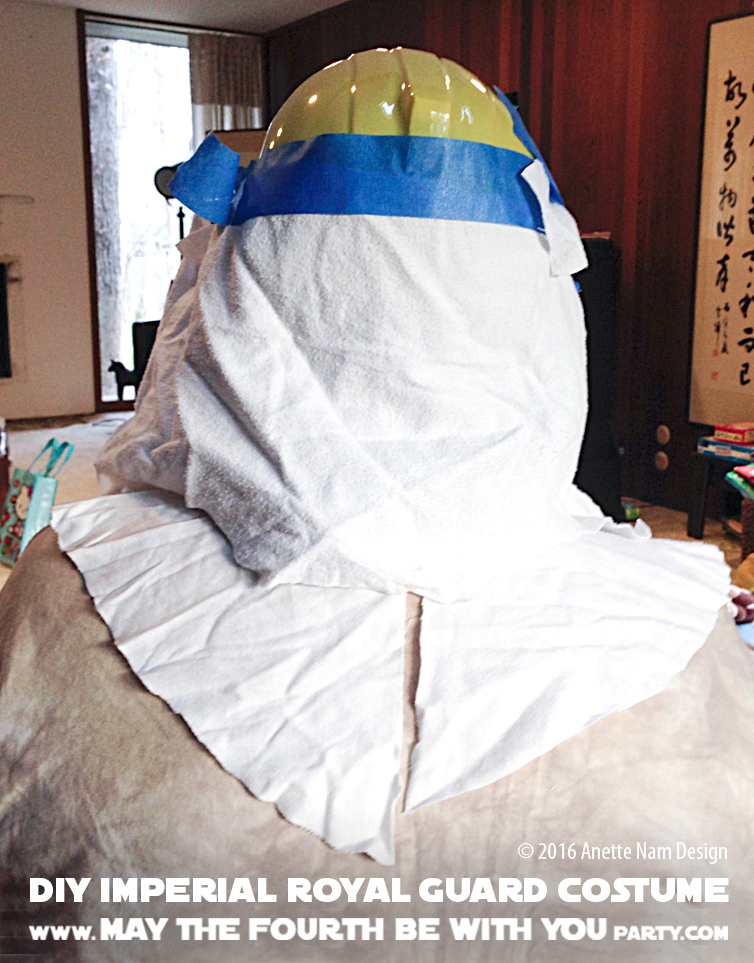
As mentioned earlier, I worked on a wing and a prayer – so I do not have very specific instructions for you. Sorry! I’m hoping the pictures will help clarify things. In contrast to my usual way of working, I actually made a sample helmet first, to make sure it would work. Except for using a different milk jug, and enlarging the helmet (the test was too small), and omitting the fabric between the helmet and the goggles, the final helmet was made the same way as the test. (Thanks Jedi Master Heidi for modeling!)

- Cut the milk jug to size.
- Punch holes in the sides with an awl – you’ll need them for better breathing!
- Cut the visor and edges off the helmet.
- If the helmet is too small, cut it in half both width and lengthwise.
- Spray paint the helmet and milk cartons with primer. Let dry.
- Spray with red spray paint. Let dry. Repeat as needed.
- Cut red vinyl for the back of the head – a rectangle-ish.
- Cut a collar with an opening in the back from the red vinyl.
- Add self-adhesive Velcro tabs in the back so it closes easily.
- Cut 2 large flat nosed triangles (I guess that is a trapezoid) for the sides.
- If you cut the helmet to make it larger, use red duct tape to put the pieces back together, leaving a gap. Don’t forget to put another piece of duct tape on the inside (so it’s not sticky).
- Have your model wear the goggles and the hat.
- Align the hat so it overlaps the top of the goggles slightly.
- Using red duct tape, tape the hat to the goggles.
- Place the milk jug mask so it overlaps the bottom of the goggles.
- Duct tape milk jug in place.
- Hold up vinyl fabric rectangle in the back of head so it overlaps the bottom of the helmet.
- Duct tape in place.
- Fold the side triangles so they look “right”… Hold up, and duct tape in place.
- Gather them at the bottom and duct tape together.

Here, you can see all the duct tape seams and air holes really well.
Robe:

- Cut fabric so you have 2 large rectangles. (as wide as the fabric comes, times, about 5″ shorter than you are tall.)
- Sew the 2 sided together until about halfway down – think a skirt with high slits on both sides
- Fold, pin and sew a channel at the top, leaving an inch or so open, so you can get the elastic in through the channel,.
- Put a safety-pin in one end of the elastic. Pin the other end somewhere close to the opening (so it doesn’t accidentally pull through).
- Push the safety-pin and elastic through the channel.
- Once all the way through, try the robe on, then adjust the size of the head opening by pulling the elastic tighter if needed.
- Tie the 2 ends in a knot.
- Adjust the length of needed.
- Hem if you want.
Misc:
- We will cover the Electro-Magentic Rods in a separate post
Tips:
I learned from this project that the craft “DUCK Tape” is not nearly as good as the regular silver stuff (Duct Tape). So use the industrial brands if you can! I used DUCK TAPE, and after just a few weeks of hanging and or laying on a shelf, the parts started to separate 😦 I never have that problems with the industrial stuff.
The helmets were pretty uncomfortable, and are quite fragile. But they really did look incredibly cool, so it was totally a worth it! I just wish I had gotten better pictures before they fell apart.
Storage is a hard on for these. Mine broke just laying on a shelf. I think those foam heads might be your best bets.
Get Supplies:
- Milk Jug
- Red Vinyl Fabric
- Red Duct Tape
- Grey Primer Spray Paint
- Red Spray Paint
- Black Protective Goggles
- Kids Thin Plastic Construction Helmet
- Velcro Tabs
- Awl
- Red Fabric
- Red Thread
- Elastic Band
- Good Scissors
- Brown or Burgundy Gloves
- Brown or Burgundy Long Sleeve Shirts
- Brown or Burgundy Pants
- Brown or Burgundy Boots

© Lucas Film Ltd. via Wookieepedia.com

Amazing costume once again!
LikeLike
Thank you for the kind words! It really is one of my favorite things to do. And I will keep going as long as the kids and the hubby let me dress them up… Heck, I will probably keep going after they stop letting me.
LikeLiked by 1 person
Maybe the husband can be the Imperial Guard and the wife can be the Republic Guard. Or vice versa.
LikeLike
Great idea! Bristles from 2 brooms for the top of the helmet maybe? 🙂
LikeLike
…And paint them black. Or you could buy a Roman Centurion helmet from a seasonal costume store, tape plastic over the nose and cheeks and paint it blue (perhaps?).
LikeLiked by 1 person
Your creativity in costumes is so amazing to me! This would be SO fun for my sweetheart and me to be as we walk the kids around trick-or-treating this year! Honestly, thank you for your hard work!
LikeLike
What a nice things to say! THANK YOU!! I do wish I had more time for costumes! I usually make 2 each Halloween (for the kids only), and 1 or 2 for May the Fourth (the kids, and us adults take turns getting new ones). But if I could, I would make 4 for each event. So much duct tape, not nearly enough time 🙂
LikeLiked by 1 person