
Kids grow so fast! We quickly realized that if we (the parents) wanted maximize our (never mind the kids’) amusement at Halloween we had to plan ahead. We needed to do all the short characters while the objects of our amusement were still small. Yoda, at about 2 feet, is the size of a pretty young child, so Yoda was our very first. R2D2, check. We still need to tackle Ewoks and Jawas. Then there is young Anakin, another shorty! So a couple of years ago, our little guy got recruited as a podracer pilot.
At 1.5 he knew the core Star Wars characters, but had no idea who Anakin was, or a podrace for that matter. But being crazy for any and all vehicles, we weren’t too concerned about his eventual enthusiasm level. So to prep, he got to watch some of Episode 1. We showed him the podrace and he of course immediately took to it. Then the planning started. The first step was a trip to Play it Again Sports to find a used helmet. We found a perfect old ski helmet. After that we were on a roll!

Disclaimer: No children were traumatized for our amusement during the making of this costume! As much as I joke about how it is all for us (the ‘rents), that is not actually true. The kids are having just as much fun as we are, and every year the costume making is a big family event. We are right in the middle of this year’s crafting, and we are having a blast.
Needed:
- Helmet:
- Used Ski Helmet
- Mason Jar Lids with Removable Insert
(or Gift Tin Lids
- Grey Primer Spray Paint
- Silver Spray Paint
- Dark Red Acrylic Paint
- Black Acrylic Paint
- Duct Tape
- Toilet Paper Rolls
- Thin Cardboard
- Plastic Grocery Bag
- Grey Pipe Cleaners
- Brown Fleece
- Black Sharpie
- Masking or Painter’s Tape
- Pants:
- Hand-me-down Beige Fleece Pants (or new Beige Pants
- Beige Speckled Fleece
- Hand-me-down Beige Fleece Pants (or new Beige Pants
- Tunic and Belt:
- Misc:
- Good Scissors
- Sewing Machine
- Glue Gun
- Safety Pins
- Pins
- Brown Shoes or Boots
- Good Scissors
How To:
Helmet:

Almost done. Just need to add some “dirt” and pipe cleaners.
- Cover any part of the helmet you do not want painted with tape (cover large areas with plastic grocery bag).
- Spray with grey primer. Let dry.
- Spray with silver spray paint. Let dry. (Repeat as needed)
- Add strips of duct tape to indicate seams.
- Dilute the red paint with a little water. Paint on the wear and tear.
- Dilute some black paint with a lot of water. Paint to add some” battle fatigue.”

Goggles:
I don’t have great instructions here – the whole things was improvised on the spot. Sorry!
- Make a 3D box with a scalloped bottom edge to fit the glasses.
- Cover in duct tape.
- Draw details with black sharpie
- Cut toilet paper rolls to use as glasses.
- Cover in duct tape.
- Glue the tin lids on TP rolls.
- Cut brown fleece strips to fit around the inside of each TP roll.
- Glue in place.
- Glue the rolls onto the scalloped box.
- Make a tiny cardboard box that will serve as a spacer between the goggles and helmet.
- Cover it with duct tape.
- Glue tiny box (and reinforce with duct tape) on front of helmet.
- Glue (and reinforce with duct tape) goggles to tiny box.
- Glue pipe cleaners in place.
Hood:
- Make a simple hood in brown fleece with long sides to place under the helmet.
Tunic: (I used the Yoda robe as a pattern)

- Cut 2 rectangles for the arms.
- Cut the 2 front pieces.
- Cat a large rectangle, for the back.
- Sew together into 2 tubes. Turn right side out.
- Place the 2 front panels face-to-face on the back.
- Pin and Sew the back shoulders together.
- With the robe still inside out, pin the arms (right side) in place, and sew.
- Sew the sides.
- Cut 2, 2″ x 24″ pieces to wrap around the wrists. Safety pin in place when wearing.
- Cut a large brown fleece triangle to as a mock shirt under the tunic. Safety pin (or sew) in place when wearing.
Belt:
- Cut a long piece of the brown belt ribbon.
- Loop one end, thread the 2 D rings on and sew in place.
- Zig-Zag (or paint with clear nail polish) the other end of the belt to avoid fraying.
Pants:
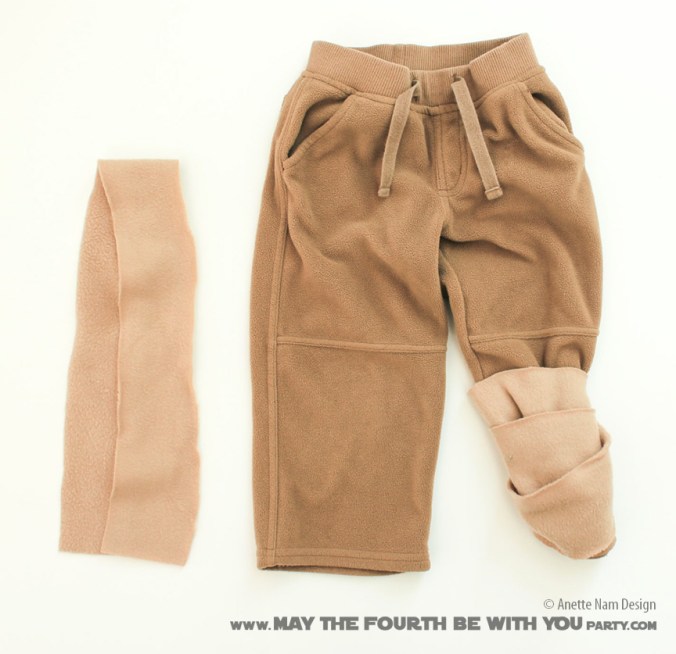
- We already had beige fleece pants that fit really well.
- Cut 2, 2″ x 24″ strips of beige fleece to wrap around the ankles. Safety pin in place when wearing.
Tips:
The beauty of using fleece is that it is so flexible. You don’t have to hem, so if the sleeves are too long, you can simply cut them (though we usually make everything a bit big so we can reuse next year). It is stretchy, so you can adjust as you go, and it is warm for Halloween nights.

© Lucas Film Ltd. via jeditemplearchives.com

© Lucas Film Ltd. via ayay.co.uk
Get Supplies:
- Used Ski Helmet
- Mason Jar Lids with Removable Insert
- Grey Primer Spray Paint
- Silver Spray Paint
- Dark Red Acrylic Paint
- Black Acrylic Paint
- Duct Tape
- Masking or Painter’s Tape
- Grey Pipe Cleaners
- Black Sharpie
- Beige Speckled Fleece
- Brown Fleece
- Being Thread
- Brown Thread
- Belt Hooks (Metal D Rings)
- Beige Pants
- Brown Shoes or Boots
- Good Scissors
- Sewing Machine
- Glue Gun

Pingback: Cutest Yoda Ever, She Was! | May the Fourth be with You Party