Our house, September
7:30 am:
– Sweetie it is time to get out of bed
– GAAAAAAAAAAAH!
– No, really, you have used up your snoozes, time to get up!
– GAAH!
4:30 pm:
– How was school? Did the spelling quiz go OK?
– GAAAAAH!
– Great! I’m glad you liked recess, but what about the quiz?
– GAAAH!
6:30 pm:
– GAAAAAAAAAAAAAAAAAAAAAAAAAAAAAAAAAAAAHHHHHHHHHHH!!!!!!
– Hey buddy! There is NO hitting your sister! Honey, why did he hit you?
– GAAAAH! GAAAAH!
– gaaaaah! gaaaaaah! gaaaaaaaaah!
– You! No stealing you brother’s lightsaber. You! no hitting!
9:30 pm:
– GAAAAAAH!
– I love you too! Good night!
(in case you don’t watch movies with the subtitles on – GAAAAAH! is how they transcribe all of Chewie’s dialogue for the subtitles)My daughter wanted to be Chewie for Halloween. And she really got in to it. (Actually, we all did!) We had a so much fur flying around the house, one would think a walking carpet had moved in. No matter how much vacuuming we did, for a month, we had little pieces of wookie fur stuck to everything.
Need:
- Wookie Fur
- Thin Knitted Gloves
- Safety Pins
- Elastic
- Wig
- Hair Spray
- Face Paint
- Vampire Teeth
- Really Good Scissors
- Sewing Machine
- Pins and Sewing Needle
- Vacuum
- Leaf Blower
Go to “Get Supplies” at the bottom of the post to get buying suggestions!
How To:
Tips:
I tend to not use real patterns for our costumes. Not that I am great as sewing or anything, I just prefer to dive right in. So I used a large sweater and sweat pants as patterns this time around. I added extra width, so we could fit her winter clothes underneath if Halloween got really cold (which it did! It snowed! We took these pictures the weekend before). I added even more in length, to be hidden in the hem, in case the kids want to use the costume when they are bigger. (which is also why we settled on a 2 piece option – more room for growth)
IMPORTANT: The first thing you HAVE to do is to take the fur outside, and blow it with your leaf blower! Not kidding! Shaking it will not do! I didn’t have this brilliant idea until about halfway through the process and it made a HUGE difference in the amount of wookie fur we found in our dinners.
Some furs have a grain, make sure you get all the fur to go the correct direction
When you cut, make sure you cut from the back side, so you do not cut the hairs. Also, as soon as you do cut, pull all the loose fur off the edges. Then go outside and shake the piece.
After you sew a seam, gently pull any fur our that has gotten stuck in the seam.
Be carefully if you use pins, they will totally disappear into fur!
Click here to get instructions on how to make the Bandolier and Bag.
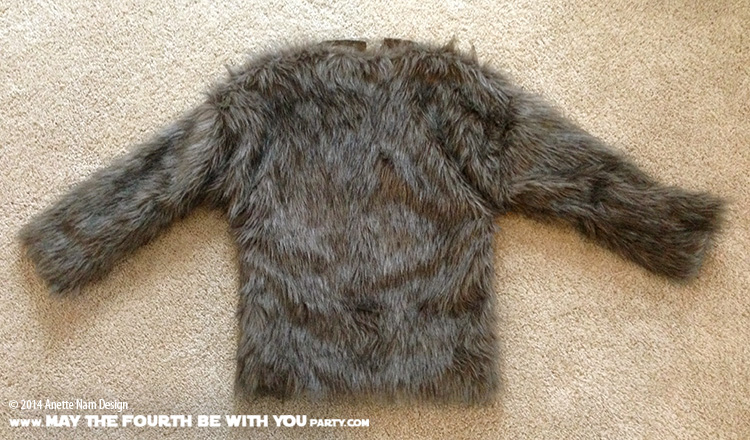
Shirt:
The top is simply 2 rectangular pieces with slight oval cut for the head, and 2 straight tubes for arms (with only 1 seam, and the top edge cut at a slight angle) I started by sewing the shoulders, then the sides, last the sleeves. I ended up cutting a slit in the back of the head hole to get head through. (just used a safety pin to close that up later). The sleeves and bottom hems were done by hand.
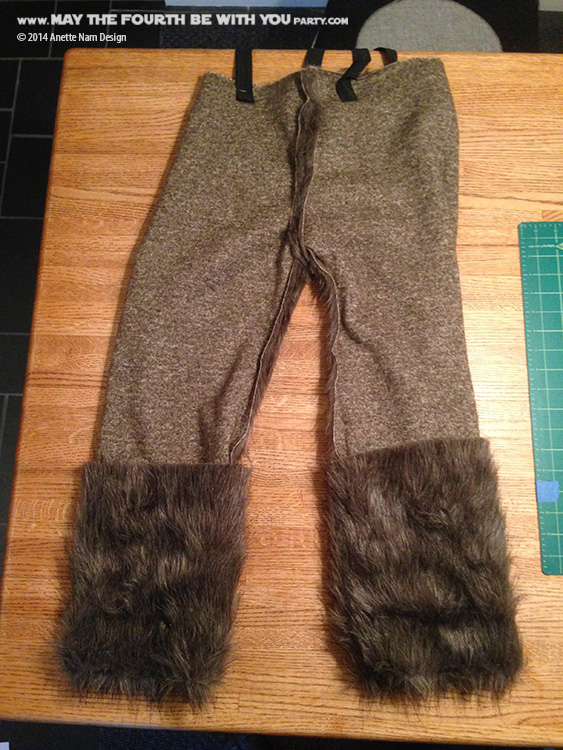
Pants:
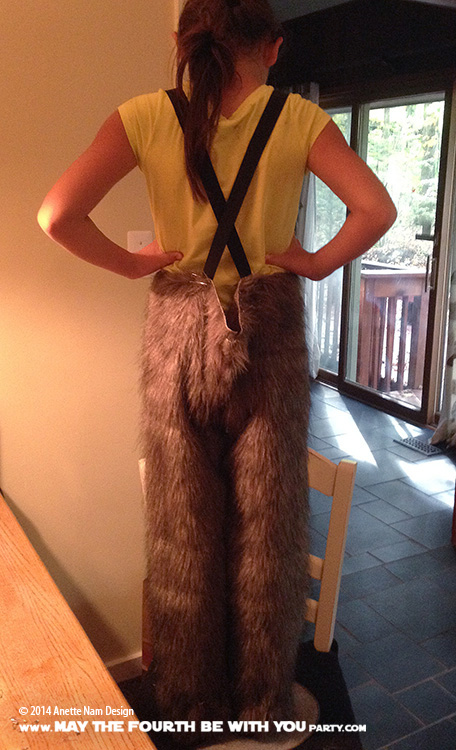
Each pant leg is just 1 piece (inseam only), slightly shaped for the groin and waist areas. Sew each pant leg, then sew the 2 legs together in the groin area, and hem by hand. Easy! I didn’t worry about the waist at all. We just put elastic at the top, like a pair of suspenders. ‘Worked like a charm.
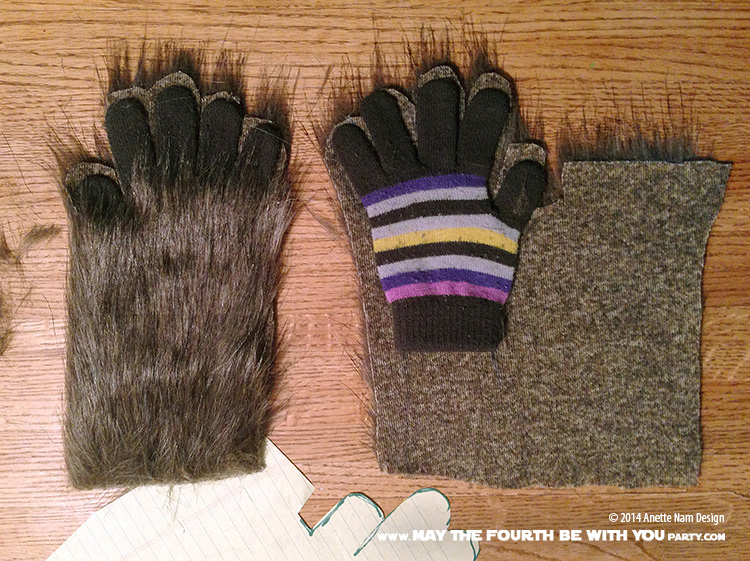
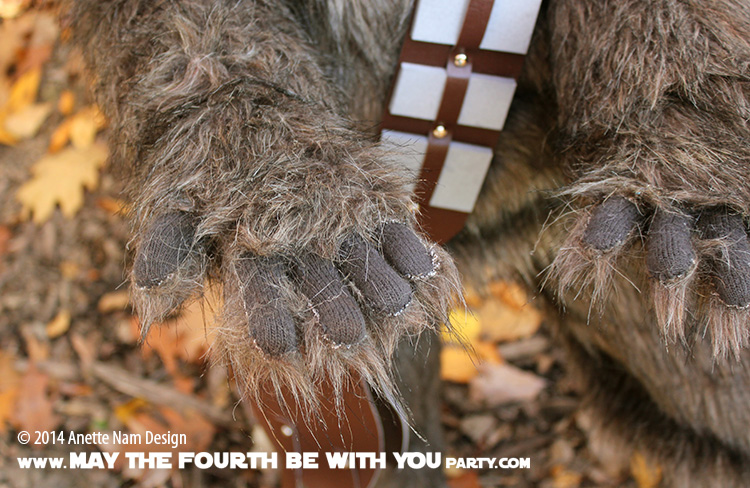
Gloves:
This was the trickiest part to figure out. It was just pure luck that I had a pair of gloves that matched in color – I could not find anything at the stores. We traced the gloves, cut sleeves for them, and sewed the fur on (by hand) all around the wrists and just the outside of the fingers. Looked great.
Feet:
I decided against using fur on the feet. Since it would be used outside, the feet would just get muddy. So we settled on an old pair of cowboy boots.
Neck:
I cut a simple dickie, just safety-pinned in the back, and tucked under the shirt.
Face:
This was the hardest for me. I hand’t done any real face painting before, and I just could’t seem to get the hang of it. Once I did, I could not get the paint to dry (Yup, I waited between colors). So many of the photos have the face paint all smeared. Better luck next time!
Hair:
We lucked out and found a wig at a local pharmacy that matched perfectly. We used a lot of hair spray to get it to keep its form. Looking back, I probably should have given it a bit of a trim. The original plan was to make a hood, but I think this worked much better.
Teeth:
We used vampire teeth, which my daughter HATED! Live and learn!
Click here to get instructions on how to make the Bandolier and Bag. The Crossbow will be covered in separate post.
And you can see pictures of Chewie with Han Solo (our son) here.
And here you can see the pictures we took of them together.
Get Supplies:
- Wookie Fur: I bought the fur at JoAnn’s before Halloween, and I can not find it, or anything like it on their online store. So here are some options at Amazon that look similar.
Faux Fur Wolf Brown/Black Fabric
Faux Fake Fur Leopard BROWN CHOCOLATE 58 Inch Wide Fabric By the Yard
Faux / Fake Fur Mongolian DARK CAMEL Fabric by the YardWe actually bought this, and I am planning on using it for an adult Wookie costume at some point in the future. It does look quite different from what we used here though.
- Thin Knitted Gloves: These look pretty close, Jacquard Acrylic Spandex Glove – Brown
- Safety Pins
- Braided Elastic
- Wig: This one seems to be in the same ball park as what we bought:
Rubie’s Costume Characters Caveman Beard And Set Wig, Brown
you can also look at werewolf masks and fur. - Face Paint
- Gingher Scissors
- SINGER 9960 Quantum Stylist 600-Stitch Computerized Sewing Machine with Extension Table, Bonus Accessories and Hard Cover
(I don’t have that one, but a girl can dream, can’t she!)

Pingback: ssssshhhhhh, it’s a secret! | May the Fourth be with You Party
Pingback: Who Shot First? | May the Fourth be with You Party
Pingback: Best Friends! | May the Fourth be with You Party
Pingback: Mos Eisleys Cantina (DIY Beverage station) | May the Fourth be with You Party
Pingback: Easy Peasy Costumes | May the Fourth be with You Party
Pingback: Ready for the Picnic (DIY Padmé Amidala Costume) | May the Fourth be with You Party
Pingback: Cutest Yoda Ever, She Was! | May the Fourth be with You Party
Pingback: Who knew Chewie had a Purse? (DIY Wookiee Belt and Bag) | May the Fourth be with You Party
How much would you charge to make one for a 3 year old boy????
LikeLike
I am so glad you like it. We do not sell any of the items we feature on the blog due to copyrights rules. However, I will do parties, and I do make cosplay/costumes by request. I will email you and we can talk!
LikeLike
How much fur fabric did you use?
LikeLike
I wish I remember. I do know it was really wide, so I think I bought the height of my daughter + some extra. (so 1.75 – 2 yards maybe) Keep in mind you have to consider the direction of the fur, so you will have more waste than you do with most solid, regular fabrics.
LikeLike
Would u email me price for costume ?
LikeLike
I’m so thrilled you like the costume that much! Unfortunately there just isn’t enough time for me to make another costume by Halloween at this point. If you are thinking for cosplay, or for Halloween of next year, I will be available for costume work again come Jan or Feb of 2017.
LikeLike
Pingback: May the 4th Be With You: Star Wars Party Ideas - landeelu.com