
This past May, after a few years of helping me make elaborate and pretty masculine costumes (General Grievous, Chewie, R2D2), my daughter requested an easy-to-wear and girly costume for our May the Fourth Party. Since she had already been Princess Leia and Ahsoka, we figured it was time for Padmé Amidala.

Turns out that Padmé’s “Picnic Dress” resembled a secondhand satin dress our daughter had been using for dress up. So with a quick trip to JoAnn and armed with my sewing kit, we were well on our way. With just a few adjustments to the dress and some well-chosen DIY accessories, we created a party (or picnic) worthy ensemble in just one evening. My #1, was thrilled, and I was proud to have created a costume that did not use any duct tape in any way, shape, or form…


Amidala’s “Picnic Dress” © Lucas Film Ltd, via cosplayisland.co.uk
Needed:
- Dress:
- Cape:
- Hair Buns:
- Hair-colored, Fabric-covered, Alice Hair Band
- Hair-colored Fleece
- Hair-colored Thread
- Batting
- Card Board
- Yellow Stretchy “Net” Elastic (That stuff people use for babies’ head bands. I bought mine at JoAnn but can not find it anywhere at the moment. I will keep looking. Please let me know if you find it anywhere else. In the meantime, making your own crocheted netting might be easier)
- Hair-colored, Fabric-covered, Alice Hair Band
- Hair Band:
- Small Satin Flowers
- Green Ribbon (Again, I bought this at JoAnn, and it seems like they no longer have it. Your best bet is probably to visit JoAnn or Michael’s and just see what they have in stock )
- Pink and Green Satin Ribbon
- Small Satin Flowers
- Misc:
- Good Scissors
- Pins
- Sewing Needle
- Good Scissors
How To:
The Dress:
- The dress was bought years earlier at the Salvation Army, and was used for dress up. With some adjustments here and there, it fit like a charm.
- Sew on little flowers by hand.
Cape:

- Fold fabric (we used a sweater for sizing) and cut a cape like the shape in the picture above.
- Hand-sew the front sleeves together to the back, long cape.
- Cut green and pink ribbons long enough that they can be wrapped around the arm a few times, and still have a good foot left over on each side. Sew the half point of each ribbon to the top of each sleeve.
- When worn, the front panel inside corners were folded in and pinned (with safety pins) into the collar of the dress.
Buns:

- Cut 2 cardboard ovals.
- Cut 2 oval pieces of fleece – large enough to cover both sides of cardboard oval.
- Place a handful of stuffing or batting on the cardboard. Cover stuffing and all of the card board with batting.
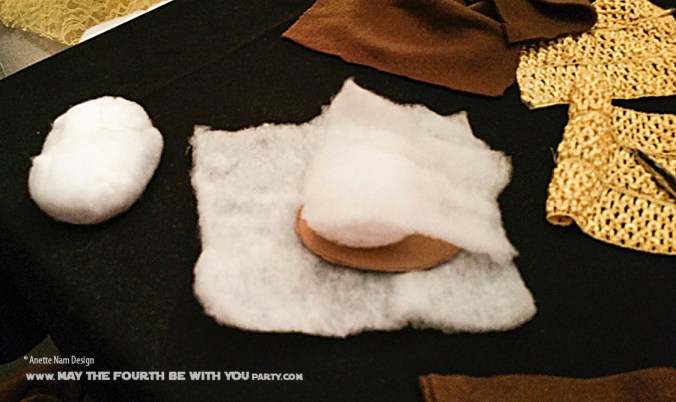
- Hand-sew in place.
- Cover the batting and cardboard with the fleece, hand-sew closed on the back. (Add more batting as needed, as you are sewing the bun closed.

- Cut the yellow stretch ribbon long enough to cover the front and the back of the buns. (I used 3 lengths for each bun.)
- Hand-sew the ribbons together to create a net wide enough to cover each bun.
- Cover the buns with net, and hand-sew in place.
- Sew the buns onto the fabric-covered headband.

Green Headband:

- Cut ribbon to just larger than the circumference of head.
- Sew closed.
- Sew small satin flowers all around.
Tips:
- If you can find them, earmuffs
in the correct hair color would work awesomely for the hair buns over the ears.
- If you are a crocheter, you can easily crochet the netting yourself.
Get Supplies:
- Yellow Vintage Dress
- Yellow Thread
- Small Satin Flowers
- Yellow Flowery Lace Fabric
- Pink and Green Satin Ribbon
- Yellow Thread
- Hair-colored, Fabric-covered, Alice Hair Band
- Hair-colored Fleece
- Hair-colored Thread
- Batting
- Yellow Stretchy “Net” Elastic (That stuff people use for babies’ head bands. I bought mine at JoAnn but can not find it anywhere at the moment. I will keep looking. Please let me know if you find it anywhere else. In the meantime, making your own crocheted netting might be easier)
- Green Ribbon (Again, I bought this at JoAnn, and it seems like they no longer have it. Your best bet is probably to visit JoAnn or Michael’s and just see what they have in stock )
- Good Scissors

Pingback: Cutest Yoda Ever, She Was! | May the Fourth be with You Party
How darling! I look forward to seeing more of your handmade Padme costumes.
LikeLike